
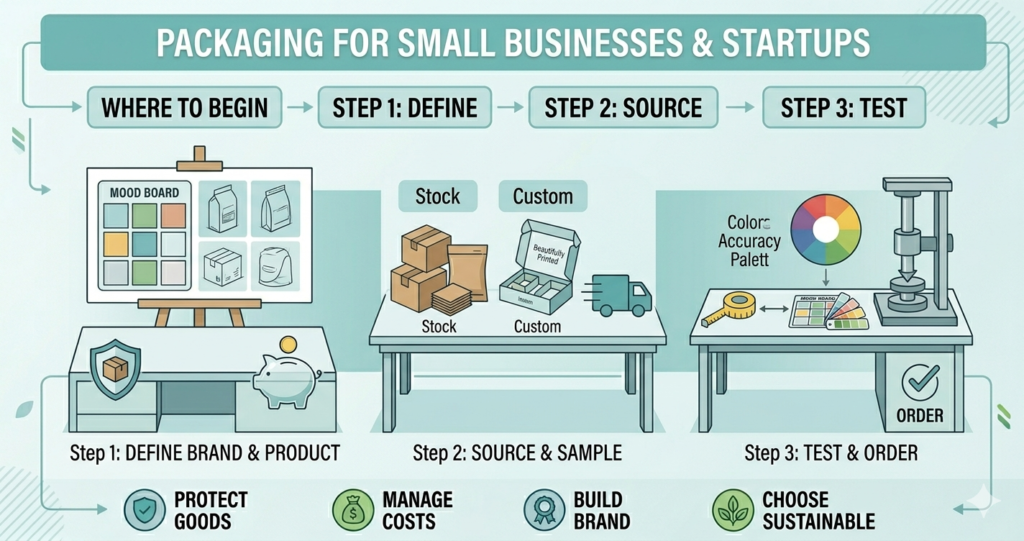
Small businesses ordering packaging for the first time face decisions about materials, printing, quantities, and budgets without experience guiding choices. Startups launching physical products often discover packaging costs more than expected, requires longer lead times than anticipated, and involves technical specifications like dielines and bleed areas that seem designed for industry insiders. Without established sales data, new businesses struggle to predict order quantities balancing inventory investment against per-unit pricing advantages.
This guide walks through the packaging decision process for businesses ordering their first custom boxes, explaining where to start, what information suppliers need, and how to make smart choices testing market response without overcommitting to untested designs.
Quick Answer: Small businesses should start with 250-500 unit orders using digital printing to test packaging designs at reasonable costs. Focus on simple box styles (mailer boxes or tuck end boxes), standard materials (18pt cardboard), and minimal finishing options. Provide accurate product dimensions, share design goals and budget constraints with suppliers, and request physical samples before production. Plan 3-4 weeks total timeline including design, sampling, and production.
Where Should Small Businesses Start With Packaging?
Understanding What Information You Actually Need
Packaging suppliers need specific product information before providing accurate recommendations or pricing. Measure product dimensions precisely in inches including length, width, and height. Record actual weight rather than estimating since material strength requirements depend on accurate weight data.
Document fragility concerns noting if products contain glass, electronics, liquids, or other vulnerable components. Describe how products will ship (individual units or multiple products per box) and whether packaging serves retail display purposes or ships direct to consumers.
Identify selling channel requirements since retail packaging needs differ from e-commerce shipping boxes. Products sold on Amazon, in Target stores, or through subscription services face different presentation and protection requirements affecting material and design choices.
Note any product-specific requirements like food-safe materials for edible goods, moisture resistance for bath products, or cushioning for fragile items. These considerations affect material selection and cannot be added as afterthoughts once designs finalize.
Establish realistic budget parameters including total packaging budget and target per-unit costs. A startup with $1,000 packaging budget makes different choices than one allocating $5,000, and suppliers can guide options matching financial constraints.
Choosing Your First Box Style
Mailer boxes suit e-commerce businesses shipping products directly to customers. These boxes ship flat, assemble without tape or tools, and provide clean presentation when customers open deliveries. Mailer boxes work well for apparel, cosmetics, books, small electronics, and subscription box products weighing under 3 pounds.
Tuck end boxes serve retail display and product packaging needs across industries. The top and bottom tuck flaps hold boxes closed without glue or tape, making them ideal for products sitting on store shelves. Tuck boxes suit cosmetics, food items, toys, health supplements, and consumer goods sold through retail channels.
Rigid setup boxes represent premium packaging tier offering luxury presentation for high-value products. These boxes arrive pre-assembled with separate lid and base construction. Jewelry, premium electronics, luxury cosmetics, and gift products justify rigid box investment where packaging significantly influences perceived value and purchase decisions.
Corrugated shipping boxes prioritize protection over presentation for products needing substantial cushioning during transit. Heavy items, fragile goods, or products shipping long distances benefit from corrugated construction. These boxes cost less than cardboard alternatives while providing superior impact resistance for products weighing over 3 pounds.
Pillow boxes, sleeve boxes, and specialty shapes add visual interest but cost 20-40% more than rectangular alternatives due to complex die-cutting and hand assembly. Most startups should master standard box styles before investing in unique structural designs.
Setting Realistic Quantity Expectations
Minimum order quantities for custom packaging typically start at 250 units using digital printing. Some suppliers require 500-unit minimums depending on box complexity and finishing options. Offset printing generally needs 1,000-unit minimums justifying plate creation costs.
First-time buyers should order quantities matching 2-4 months of projected sales rather than entire year’s inventory. This approach tests packaging performance and customer response while allowing design refinements based on early feedback. A business projecting 50 units monthly orders 250 boxes covering 5 months without excessive inventory investment.
Per-unit costs drop significantly at higher quantities, but startups risk obsolete inventory if designs change or sales projections miss targets. A $1.20 per box cost at 250 units versus $0.65 at 1,000 units tempts larger orders, but 750 unused boxes represent wasted investment if redesign becomes necessary.
Consider product lifecycle and seasonal factors when determining quantities. Products with frequent formula changes, packaging updates, or limited seasonal relevance favor smaller initial orders. Stable products with consistent demand justify larger quantities capturing better pricing.
Storage space affects quantity decisions for businesses operating from homes, small offices, or shared workspaces. Packaging boxes arrive on pallets requiring floor space. Calculate available storage before ordering quantities exceeding practical warehousing capacity.
What Budget Should Small Businesses Allocate for First Packaging Orders?
Understanding Total First-Order Costs
First packaging orders include one-time setup costs plus per-unit packaging expenses. Setup costs cover die creation ($150-450), printing plates or digital file preparation ($100-400), and design services ($350-1,200 if needed). These costs add $600-2,000 to initial orders but don’t repeat on reorders.
Per-unit costs for first orders at 250-500 quantities typically run $1.20-2.50 per box depending on size, material, printing complexity, and finishing options. Simple mailer boxes with basic printing cost toward lower end while full-color tuck boxes with lamination approach higher range.
Budget $1,500-3,000 total for a first order of 250-500 boxes including all setup costs, per-unit pricing, and shipping. This covers standard box styles with full-color printing and basic finishing adequate for professional market launch.
Physical samples before production add $45-85 per sample. Order 2-3 samples testing different finishes or seeing how artwork prints on actual material before committing to full production runs.
Artwork and design services through freelancers cost $200-800 for packaging design including dieline work and print-ready file preparation. Packaging suppliers offering design services charge $350-1,200 depending on complexity. Some suppliers include basic design support at no charge for orders over certain quantities.
Where Small Budgets Should Compromise vs Invest
Reduce color count from full four-color printing to one or two-color designs saving $150-300 on setup costs and $0.15-0.25 per box on printing. Strong two-color designs create professional appearance at lower costs for businesses with tight budgets.
Start with aqueous coating ($0.03-0.06 per box) instead of lamination ($0.08-0.15 per box) providing basic protection at lower costs. Upgrade to lamination on reorders once business validates product-market fit and generates revenue supporting higher packaging investment.
Choose standard rectangular boxes over custom shapes saving 20-40% in die costs and production expenses. Distinctive design, color schemes, and graphics create brand differentiation without requiring complex structural designs.
Invest in full-color printing rather than cutting to one-color designs when budget allows. Professional full-color graphics significantly impact customer perception and perceived product value, influencing purchase decisions and brand credibility. Saving $200 on printing while appearing unprofessional in competitive markets represents false economy.
Invest in physical samples before production avoiding costly mistakes. Spending $75 on samples prevents discovering artwork problems, color mismatches, or structural issues after producing 500 boxes. Sample costs represent insurance against expensive production errors.
Skip specialty finishes like foil stamping, embossing, or soft-touch coating on first orders. These premium features add $0.15-0.40 per box and appeal primarily to established brands with proven markets. Test core packaging functionality and design before adding luxury embellishments.
How Should Startups Approach Packaging Design?
DIY Design Using Supplier Templates
Many packaging suppliers provide free dieline templates allowing businesses with design skills to create artwork in-house. Download templates in Adobe Illustrator format matching chosen box style and dimensions.
Dielines show exact cut lines, fold scores, glue tabs, and safe design areas where text and graphics should stay. Place important elements at least 0.125 inches inside trim lines preventing content from being cut off during die-cutting.
Include 0.125-inch bleed extending background colors and images beyond trim lines. Bleed ensures no white edges appear if cutting shifts slightly during production. Elements you want cut at exact edges (like box edges) must extend into bleed area.
Design in CMYK color mode rather than RGB since printing uses cyan, magenta, yellow, and black inks. RGB colors on screen convert to CMYK for printing, sometimes shifting appearance. Working in CMYK from start prevents color surprises on printed boxes.
Convert all text to outlines before submitting files to suppliers. Outlined text embeds font shapes in files preventing font substitution issues if suppliers lack specific fonts. This step ensures text appears exactly as designed.
Maintain minimum 8pt font size for body text and 10pt for important information ensuring readability. Smaller text may blur or become illegible when printed, especially on textured materials like kraft paper or corrugated board.
Hiring Freelance Designers
Freelance packaging designers on platforms like Upwork, Fiverr, or 99designs charge $200-800 for custom packaging design including dieline work and print-ready files. Experienced designers familiar with packaging specifications prevent technical errors causing production delays.
Provide designers with detailed briefs including brand colors (Pantone numbers or CMYK values), logos, product photos, target customer demographics, and competitor packaging examples. Clear briefs produce designs matching vision without extensive revision rounds.
Request designs in Adobe Illustrator format as editable vector files with separated layers. Layered files allow easy updates for future product variations or packaging changes without redesigning from scratch.
Ask designers to include dielines in design files ensuring artwork aligns properly with structural elements. Designers unfamiliar with packaging may create beautiful graphics that don’t account for fold lines, glue areas, or cutting tolerances.
Budget 1-2 weeks for design development including concept revisions and final file preparation. Rush design timelines increase costs or result in rushed work with potential errors affecting production.
Using Supplier Design Services
Packaging suppliers offering design services understand technical requirements like bleeds, safe zones, and material-specific considerations. Prices range from $350-1,200 depending on design complexity, with some suppliers including basic design support free for orders over 500-1,000 units.
Supplier designers often work faster than external freelancers since they design for their own production equipment and material specifications. This familiarity reduces technical errors and revision needs.
Discuss design goals, brand positioning, target customers, and budget constraints directly with supplier design teams. Internal designers can recommend cost-effective design approaches balancing visual impact with production efficiency.
Request 2-3 design concepts exploring different visual directions before selecting one for refinement. Multiple concepts prevent committing to single direction without exploring alternatives that might better achieve goals.
Supplier design services sometimes limit revision rounds (typically 2-3 included) with additional revisions incurring charges. Consolidate feedback and provide clear direction reducing revision needs and associated costs.
What Technical Specifications Do Suppliers Need?
Understanding Dielines and Templates
Dielines show exact structural layout of boxes flattened into two dimensions before folding. They mark cut lines (where material cuts), score lines (where boxes fold), glue tabs (where adhesive applies), and safe zones (where important content should stay).
Download dieline templates matching chosen box style and dimensions from supplier websites or request them when discussing projects. Templates ensure artwork aligns properly with physical box structure.
Design directly on dieline layers in Adobe Illustrator, keeping dieline visible while working to ensure graphics align with structural elements. Lock dieline layer preventing accidental movement of structural elements.
Important content like logos, product names, or critical text must stay 0.125-0.25 inches inside cutting lines (safe zone). Content too close to edges may cut off if die-cutting shifts slightly during production.
Background colors and images must extend 0.125 inches beyond cut lines (bleed area) ensuring no white edges if cutting varies slightly. Bleed prevents visible white paper showing at box edges.
File Format and Resolution Requirements
Submit final artwork as Adobe Illustrator (.ai) or PDF files with outlined fonts and embedded images. These vector formats scale without quality loss and include technical specifications printers need.
Images embedded in designs must be minimum 300 DPI (dots per inch) at actual print size. Lower resolution images appear pixelated or blurry when printed at full scale. Product photos, logos, or graphics below 300 DPI need higher-resolution replacements.
Save files in CMYK color mode (cyan, magenta, yellow, black) matching printing ink colors. RGB files (red, green, blue used for screens) must convert to CMYK for printing, potentially shifting colors from screen appearance.
Convert all fonts to outlines before submitting files. Outlined text becomes vector shapes preventing font substitution if printers lack specific fonts. Text remaining as editable fonts may display incorrectly if fonts missing.
Include crop marks, registration marks, and color bars if supplier requests them. Many suppliers add these production marks themselves, but check technical requirements during file submission.
Color Specifications and Proofing
Specify colors using CMYK values (like C:0 M:100 Y:100 K:0 for red) for accurate reproduction. Pantone spot colors require specific callouts (like Pantone 485 C) with understanding that spot colors cost more than CMYK process printing.
Request digital proofs showing how artwork prints on actual material before full production. Digital proofs cost $45-85 but prevent discovering color mismatches, layout errors, or print quality issues after producing hundreds of boxes.
Understand that colors appear differently on various materials. White cardboard shows brighter, more accurate colors than kraft paper’s brown base. Coated materials produce more vibrant colors than uncoated stocks. Request proofs on actual production materials seeing real results.
Screen colors never match printed colors exactly due to different color reproduction systems (RGB screens vs CMYK printing). Physical proofs show true printed appearance better than screen displays.
Large areas of solid color may show slight variations across print runs. This normal printing characteristic becomes more noticeable on large color fields. Consider gradient backgrounds or textured patterns instead of flat solids when possible.
What Timeline Should Small Businesses Expect?
Week 1: Research and Planning
Research box styles, materials, and suppliers gathering information about options and pricing. Request quotes from 2-3 suppliers comparing costs, timelines, and services offered.
Measure products accurately and determine protection requirements based on weight, fragility, and shipping methods. Calculate how many units need packaging monthly estimating initial order quantities.
Set budget parameters including total available packaging funds and target per-unit costs. Budget constraints guide material selections and finishing choices preventing wasted time exploring options exceeding financial capacity.
Review supplier portfolios seeing previous packaging examples and reading customer reviews. Established suppliers with positive reviews and professional portfolios reduce risk for first-time buyers.
Decide on design approach (DIY, freelancer, or supplier services) based on design skills, time availability, and budget. Factor design timeline into total project schedule.
Week 2-3: Design Development
Create or commission packaging artwork including all graphics, text, colors, and structural elements. Allow adequate time for design development, revision rounds, and final file preparation.
Submit design files to suppliers for review catching technical issues like insufficient bleed, low-resolution images, or elements outside safe zones. Address supplier feedback before requesting samples.
Order physical samples seeing how designs print on actual materials and how boxes assemble. Samples take 5-7 business days to produce plus shipping time.
Review samples checking print quality, color accuracy, structural assembly, and overall appearance. Test samples with actual products ensuring proper fit and adequate protection.
Approve final samples for production or request minor adjustments before proceeding. Some adjustments (color tweaks, small text changes) make quickly while major revisions may require new samples.
Week 3-4: Production and Delivery
Production begins after final approval and payment confirmation. Standard production timelines run 8-10 business days for digital printing on cardboard or corrugated materials.
Specialty finishes (foil stamping, embossing, spot UV) add 3-5 business days to production schedules. Complex rigid boxes requiring hand assembly extend timelines 5-7 business days beyond standard boxes.
Shipping time varies by destination and method. Ground freight to nearby states takes 2-4 business days while cross-country shipments need 5-7 business days. Expedited shipping options reduce transit time at higher costs.
Total timeline from project start to packaging delivery typically spans 3-4 weeks for straightforward projects. Complex designs, multiple revision rounds, or specialty finishes may extend to 5-6 weeks.
Rush production available for time-sensitive launches adds 25-50% cost premium depending on how much timeline compression needed. Standard timelines produce better results at lower costs when launch schedules allow.
What Questions Should You Ask Packaging Suppliers?
About Capabilities and Services
Ask what minimum order quantities apply to different box styles, materials, and printing methods. Minimums vary by supplier and specifications, affecting whether you can order desired quantities.
Inquire about design services including what’s included, revision limits, costs, and typical timelines. Understanding design support helps budget and schedule projects appropriately.
Request information about available materials, printing methods, and finishing options. Not all suppliers offer all options, so verify capabilities match your needs before investing time in detailed discussions.
Ask about sampling process including costs, timelines, and how many samples can be ordered. Understanding sampling procedures helps plan review and approval phases.
Inquire whether dies remain on file for reorders and how long suppliers store artwork. Dies remaining on file eliminate those costs from reorders, and stored artwork makes reordering simpler.
About Pricing and Costs
Request detailed quotes breaking down die costs, setup fees, per-unit pricing, finishing charges, and shipping expenses separately. Itemized quotes allow accurate cost comparisons between suppliers and help understand where money goes.
Ask about pricing at multiple quantities (250, 500, 1,000 units) seeing how per-unit costs change with volume. This information helps determine optimal order quantities balancing cost efficiency with inventory risk.
Inquire about payment terms including deposit requirements, when final payment is due, and accepted payment methods. Some suppliers require 50% deposits before starting production with balance due before shipping.
Ask about potential additional costs like artwork revision fees beyond included rounds, rush production charges, or expedited shipping rates. Understanding potential extra costs prevents budget surprises.
Inquire about reorder pricing and whether setup costs apply to second orders. Knowing reorder economics helps evaluate total packaging investment across multiple orders.
About Production and Quality
Ask about typical production timelines for your specific box type and finishing requirements. Standard timelines help plan product launches and inventory needs appropriately.
Inquire about quality control processes including how defects are handled, what quantity tolerances apply (overrun/underrun policies), and what remedies exist if quality issues occur.
Request information about proofing options including digital proof costs, physical sample availability, and approval processes before production begins.
Ask about rush production availability, timeline compression possibilities, and associated cost premiums. Understanding expedited options helps manage unexpected timeline pressures.
Inquire about shipping methods, carrier selection, tracking information, and delivery timelines to your specific location. Delivery logistics affect total project timeline and should factor into planning.
How Can Small Businesses Test Packaging Before Committing?
Starting With Minimum Viable Orders
Order smallest practical quantities (250-500 units) testing packaging performance and customer response before committing to larger inventory. Small initial orders allow design refinement based on real-world feedback without obsolete inventory risk.
Use initial orders to test assembly ease, shipping durability, and customer unboxing experience. Pack actual products, ship boxes to yourself or test customers, and evaluate protection adequacy and presentation quality.
Monitor customer feedback about packaging through reviews, social media comments, and direct communication. Note comments about box quality, opening experience, sustainability preferences, or presentation appeal informing future packaging decisions.
Track damage rates and return issues potentially related to packaging inadequacy. Products arriving damaged signal need for stronger materials or better internal cushioning before scaling production.
Evaluate packaging efficiency including assembly time, storage requirements, and shipping cost impact through dimensional weight. Practical experience reveals optimization opportunities not apparent during initial design.
Using Samples Strategically
Order samples in multiple finish options comparing matte versus gloss lamination or testing different coating types. Seeing physical differences helps make informed finishing decisions matching brand positioning and budget.
Request samples of similar boxes in different materials comparing 18pt versus 24pt cardstock or cardboard versus corrugated construction. Hands-on comparison reveals material differences affecting decisions.
Test samples with actual products checking fit, protection level, and assembly ease. Products fitting too tightly or loosely signal dimension adjustments needed before production.
Share samples with potential customers, retail buyers, or trusted advisors gathering feedback before production. Outside perspectives catch issues or opportunities internal teams overlook.
Photograph samples in good lighting from multiple angles creating visual references for evaluating production units against approved samples when orders arrive.
Building in Flexibility for Changes
Start with simple, easily modified designs allowing adjustments based on early market feedback. Complex structural designs or expensive finishes make iteration costly if changes become necessary.
Design packaging with modular elements where product names, scents, or variations can change without redesigning entire box. Strategic design choices reduce costs when expanding product lines.
Use sticker labels for variable information (ingredients, batch numbers, personalization) on otherwise standardized boxes. This approach combines custom packaging’s professional appearance with operational flexibility.
Plan reorder timing allowing incorporation of feedback and improvements from initial packaging performance. Ordering 3-4 months of inventory rather than year’s supply ensures ability to iterate designs regularly.
Track packaging performance metrics including damage rates, customer satisfaction, assembly time, and shipping costs. Data-driven decisions improve packaging effectiveness through successive iterations.
What Common Mistakes Should First-Time Buyers Avoid?
Ordering Too Many Units Initially
Overcommitting to large quantities before validating product-market fit risks obsolete inventory if products don’t sell as projected or if design changes become necessary. A business ordering 2,500 boxes based on optimistic projections faces write-off costs if reality underperforms expectations.
Storage costs and space requirements affect businesses operating from limited facilities. Pallets of packaging boxes consume valuable square footage potentially needed for inventory, operations, or workspace.
Product formulation changes, regulatory updates, or brand evolution may necessitate packaging redesign within first year. Large initial orders prevent incorporating improvements learned from market experience.
Start with 250-500 units covering 2-4 months of realistic sales projections. Reorder before inventory depletes incorporating learnings from initial market response.
Choosing Complex Designs or Premium Materials First
Specialty finishes, unique shapes, or rigid construction add significant costs without proven market response justifying premium investment. A startup spending $3.50 per box on luxury rigid packaging before validating product demand risks substantial losses if market response disappoints.
Complex structural designs require longer production times, higher minimums, and increased costs. Master standard box styles before investing in custom shapes or multi-piece constructions.
Start with professional but straightforward packaging using quality materials and good design without premium embellishments. Upgrade to luxury finishes after establishing market presence and generating revenue supporting higher packaging costs.
Many successful brands launch with simple packaging focusing resources on product development, marketing, and customer acquisition. Packaging can evolve as business grows rather than requiring perfection from day one.
Skipping Physical Samples
Proceeding to production without reviewing physical samples creates risk of expensive surprises when boxes arrive. Colors appearing different than expected, materials feeling cheaper than imagined, or structural issues affecting assembly all become costly problems after producing hundreds of boxes.
Digital proofs on screens cannot replicate actual material feel, print quality, or three-dimensional appearance of assembled boxes. Physical samples provide information screen viewing cannot deliver.
Sample costs ($45-85) represent minimal investment compared to potential problems they prevent. Consider samples as insurance against production mistakes affecting hundreds of units.
Order samples early in timeline allowing adequate review before production deadlines pressure decisions. Rushed sample reviews miss important details requiring corrections.
Ignoring Technical Requirements
Submitting artwork files without proper bleed, insufficient resolution images, or RGB color modes causes production delays while suppliers request corrections. Technical errors extend timelines and may result in additional charges for file corrections.
Not converting text to outlines risks font substitution issues if suppliers lack specific fonts. Text appearing different than designed due to font problems affects brand presentation and requires reprinting.
Ignoring safe zones by placing important content too close to cut lines results in text or logos getting cut off during die-cutting. Respecting safe zones ensures critical elements stay where intended.
Follow supplier technical specifications exactly rather than assuming general design knowledge transfers to packaging production. Packaging has specific requirements differing from other print design applications.
Waiting Until Last Minute to Order
Packaging production requires 3-4 weeks minimum including design, sampling, production, and shipping. Businesses launching products without adequate packaging lead time face rush fees, limited design time, or delayed launches waiting for packaging.
Rush production adds 25-50% cost premiums while limiting revision and sampling opportunities. Standard timelines produce better results at lower costs with reduced stress.
Plan packaging projects 6-8 weeks before needed delivery dates allowing time for design development, supplier selection, sampling, revisions, production, and shipping. Buffer time accommodates unexpected delays without affecting launch schedules.
Reorder before depleting inventory rather than waiting until packaging runs out. Maintaining safety stock of 2-3 weeks prevents emergency rush orders when lead times exceed expectations.
Final Thoughts
Small businesses and startups should approach packaging as iterative process rather than seeking perfection in first orders. Start with manageable quantities (250-500 units) using simple box styles, standard materials, and digital printing testing market response without excessive inventory commitment.
Focus initial packaging investment on professional appearance, adequate protection, and clear brand presentation rather than premium finishes or complex structures. Strong design and quality materials create positive customer impressions without requiring luxury packaging budgets.
Work with packaging suppliers offering low minimum quantities, design support, and transparent pricing. Request physical samples before production, maintain realistic timelines avoiding rush fees, and plan reorders before inventory depletion allowing design improvements based on market feedback.
The right first packaging order balances professional quality with financial prudence, provides adequate protection during shipping, and represents your brand effectively to customers. Packaging can evolve as your business grows, incorporating customer feedback and supporting expansion through strategic iteration rather than requiring massive upfront investment before proving product-market fit.